How to Map Picklist or Option Set Fields During a CRM Integration or Migration

Overview
This post details two techniques for handling the transfer of Pick list fields (also known as Drop-down fields or Option Set fields) during a CRM migration or integration. The SQL examples provided below make it fast and easy to find relevant values and then map them to the destination CRM system.
Why can it be Difficult to Map Pick lists and Option Set Fields?
Different values for Pick lists and Option Set Fields are often needed in the new CRM system either because there is a different setup, the business process has changed, or the move provides an opportunity to clean things up. This means there often both mapping and data transformation involved.
For instance, let’s say a company was migrating to Dynamics CRM or Salesforce, and had the following information in the account status field of their current CRM system:
NULL
No value assigned
Active
Cold
New
Warm
SomeRandomJunk
In the new system, we may want different values for account status, such as those listed in the TARGET column below.
SOURCE             TARGET
Active             Active
Warm               Pending
NULL or No value   Inactive
To achieve this, we need to find the source values and map them to the new values. The following sections show how we would tackle this.
How do you find the values to be mapped?
It’s one thing to see values in a drop-down and quite another to locate this information in a database, so the first question to answer is: what values do we have in the source fields? Very often, there are values that are no longer wanted or that had been forgotten about, as well as values that need to be mapped.
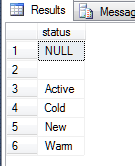
SELECT DISTINCT status FROM account ORDER BY status
This query would return an ordered list of all the values of the status field in the account table. For our example account, the results look like this:
This is very basic information, however. A more useful query is:
SELECT status, count(status) FROM account
GROUP BY status
ORDER BY count(status) DESC
This query not only returns a list of all the values of the status field in the account table, it also provides a count of how many times each value is used. Here are the results from our sample data:
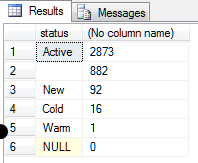
This sort of search can produce unexpected results – for example, notice that status ‘blank’ has occurred 882 times; this is probably something you’d want to look at further, for instance to see if there is another field that can give us more information on the account status. Conversely, the status ‘NULL’ never actually occurs, so we don’t need to worry about this in mapping.
These queries can be used for a wide range of pick lists by replacing ‘status’ and ‘account’ with the name of the field and table you need to map. As an example, you may have customer types – Partner, End User, Vendor, etc…. or product types in drop-down options. As long as you put in the correct names for the information you’re interested in, these queries will find the relevant values for you.
Data obtained in this way, however, is only useful if it can be mapping. One approach for doing this is to use Excel, and another is to use File Maps. Following are details for both.
How to Map Using Excel
When using Excel to map, the basic idea is to set up a worksheet in Excel that has the values from the source database, and the required mapped values for the target. For example:
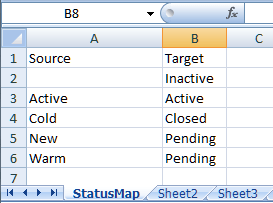
The source column in Excel can be populated by doing the query in SQL, then right click – Copy on the results, then pasting into the Excel column. Alternatively, you can save the results to a CSV file, and then load them into Excel.
We performed the next steps in Inaport, where we can do a couple of things:
Add new fields to the incoming record to store new values in. In our example, we add a new field called ‘newStatus’, and initialize it to ‘Inactive’.

The second step is to check if the STATUS field has a value, and if it does, query the Excel spreadsheet with the source value to get the mapped target value:

This step is slightly more complex. The function we used is ‘dbselectp()’ which lets us execute a SQL query. The actual query we did is: The result of all this work is:
select target from `StatusMap$` where source = '@1'
The ‘@1’ is a parameter, which we assign using the expression ‘trim(#STATUS)’. This gets the value of the status field and trims any spaces off it.
The result of all this work is:
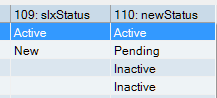
The ‘newStatus’ field has been correctly populated with the mapped value from the Excel spreadsheet.
How to Use Inaport File Maps
One issue you may have noticed with using Excel to map is that we have two source values (New and Warm) both mapping to Pending. This is an example of what is often a larger problem – many values mapping to one. This can be complicated by many variants of a value – for instance, new, neew, warmish…- depending on how good the original quality control was for the source data. All too often, the data quality of values being transferred is is not so good.
We can set up a map that maps every one of these variants, but it is better (and much faster) to use wild cards. Inaport actually supports full regular expressions, using File Maps, so this provides a good solution.
To create a file map, go to File – New File Map in the main menu. The File Map Editor will pop open, which allows you to create a file with multiple maps. We’ve set up a version of the Status Map like this:
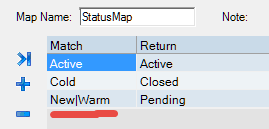
The line to notice is highlighted: “New|Warm”. This is a regular expression that will match either “New” or “Warm” – allowing us to set up a map that maps “New” OR “Warm” to teh new value “Pending”. Depending on the values, we could get much more sophisitcated. For example “Ne.*|War.*” would match ALL words that started with “Ne” or “Wa”.
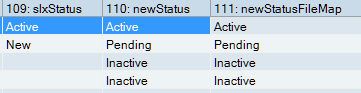
We created a new field called “newStatusFileMap”, and populated it with the expression:

The “fmapregex()” function looks up the specified map and does a regular expression match to find the correct value to return.
The results are shown here:
Conclusion
In this post we outlined some techniques for identifying field values that need remapping, and clean techniques for implementing remapping, including many-to-one mappings. The two approaches have complementary strengths:
- Excel mapping – easy to set up and maintain
- File mapping – slightly more work, but much better at handling dirty data
These steps are just a small part of the overall migration or integration process however it’s still useful to verify results with a test run and Inaport’s preview capabilities. It’s all part of the process for ensuring a quick, accurate and no risk outcome.

