How to Succeed in CRM Integration and Migration: Database Reverse Engineering

This “How to” post describes techniques for successful data transfer between CRM systems and external applications when the databases involved are poorly labeled, large and very complex.
Moving information into CRM systems happens all the time and is important for providing a unified client view. Sometimes this is a reasonably straightforward task, but more often than not there are impediments that make the mapping between different systems extremely difficult.
Problems with mapping can lead to incorrect results and/or a drawn out and laborious process. The objective of this post is provide tools and an approach to help quickly identify the data needing to be moved, whether it’s to Salesforce, Microsoft Dynamics CRM, Sage CRM or one of many other CRM solutions.
Overview
If you are new to CRM migration and integration projects, or if you’ve only worked with well defined and understood databases, you might wonder why any database analysis is needed.
The easiest way to answer this is to describe a recent Inaport project that involved integrating two custom systems (one for loan mergers and the other for deposit management) with Salesforce.
In this case, the databases of the two financial applications were a black box for the customer, who provided screen shots of the user interfaces as their mapping schemas. Boxes were labelled L1, L2,… in the source screens, for example, the account name was L1, the dividend rate was INV-11, and so on. These codes were then placed on the Salesforce screen shots to indicate where the data should be placed.
When we had a look at the databases we found over 400 tables with names like AACHPN, AEFTBS, FFAITM,… and other equally illuminating descriptions. Many of the tables had over 200 fields (yes, that’s a lot of possible combinations!) and we needed to find the required data hidden away in all of this.
Dumping Schema
One of the tools we use to overcome this sort of problem is a SQL script that will dump the row counts in all of the tables. This allows us to quickly discount tables that have little or no data. We can also order the dump by row count, and identify potential header tables by the row count.
The SQL that achieves this is:
CREATE TABLE aaa_TblDump(TABLE_NAME varchar(256), TBL_ROWS int)
GO
DECLARE cursSql CURSOR
FOR
SELECT 'SELECT ' + '''[' + TABLE_NAME + ']''' + ', COUNT(*) AS TBL_ROWS FROM [' + TABLE_NAME + ']' AS SQL
FROM INFORMATION_SCHEMA.Tables WHERE TABLE_TYPE = 'BASE TABLE'
DECLARE @SQL varchar(8000)
OPEN cursSql
FETCH NEXT FROM cursSql INTO @SQL
WHILE @@FETCH_STATUS = 0
BEGIN
INSERT INTO aaa_TblDump(TABLE_NAME, TBL_ROWS)
EXEC(@SQL)
FETCH NEXT FROM cursSql INTO @SQL
END
CLOSE myCursor99
DEALLOCATE myCursor99
This first part simply creates a table to hold the data (aaa_TblDump).
The second part then scans the INFORMATION_SCHEMA tables to generate a SQL cursor that holds rows of SQL SELECT statements that look like this:
SELECT [someTable], count(*) as TBL_ROWS FROM [someTable]
The cursor is then iterated over to actually dump the data into the aaa_TblDump, giving us a single table that holds the name of each table and its row count. We can then select from that table by table name:
select * from aaa_TblDump order by table_name asc
or by row count:
select * from aaa_TblDump order by tbl_rows desc
Data Searching
Even with this information available, identifying particular fields with the required data can be difficult. With this project, for example, simply finding the account name was quite a challenge. Enter the second tool in our armory – ApexSQL Search. This is a free download from ApexSQL, and integrates very nicely with SQL Server Management Studio.
Once installed, ApexSQL Search provides the ability to search for text, numeric values, dates or empty/null fields across all, or selected, tables and views. When it was used to search for account name it found 739 matches across 15 tables in only a couple of seconds. Only two tables had just one match, which made them good candidates for the header table.
Searching for the “Annual % Yield” required value, identified one table and the required field in the table, again in a couple of seconds.
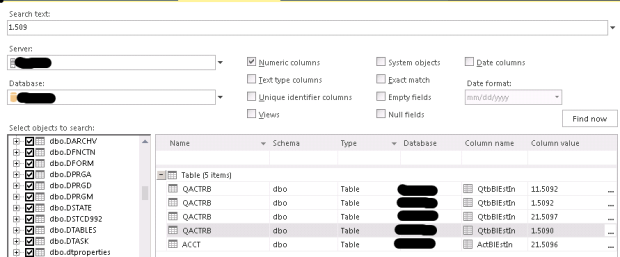
By default, the Search includes all tables in the database. This can result in many hits if the value being searched is in (for example) many rows of a transaction table. On the left hand side you can deselect one or more tables to start narrowing down the search (hint: right click brings up a context menu that allows you to deselect all tables).
As the fields are identified, we build up SQL SELECT statements that capture the information in a way that is traceable back to the source documentation, by aliasing the field names:
SELECT acntName AS account_L1, anyld AS AnnualYield_L17, ... FROM someTable
These SQL statements can then be copied and pasted into Inaport.
With this combination of tools, identifying the required data in the database, although still not fun, becomes possible in a sensible time frame.
Next Up – How To Work with Pick Lists / Option Sets
The process of working with the data we are given does not end with identifying the source format.
Another problem we face is mapping fields with defined sets of values – for example, an account status or a loan status.
In the next “How To” blog post we provide a proven approach for efficiently handling pick lists, or option sets, in the source and target.
If you would like to discuss any aspect of a migration or integration with InaPlex, please feel free to complete a Contact Request form, or simply give us a call.

